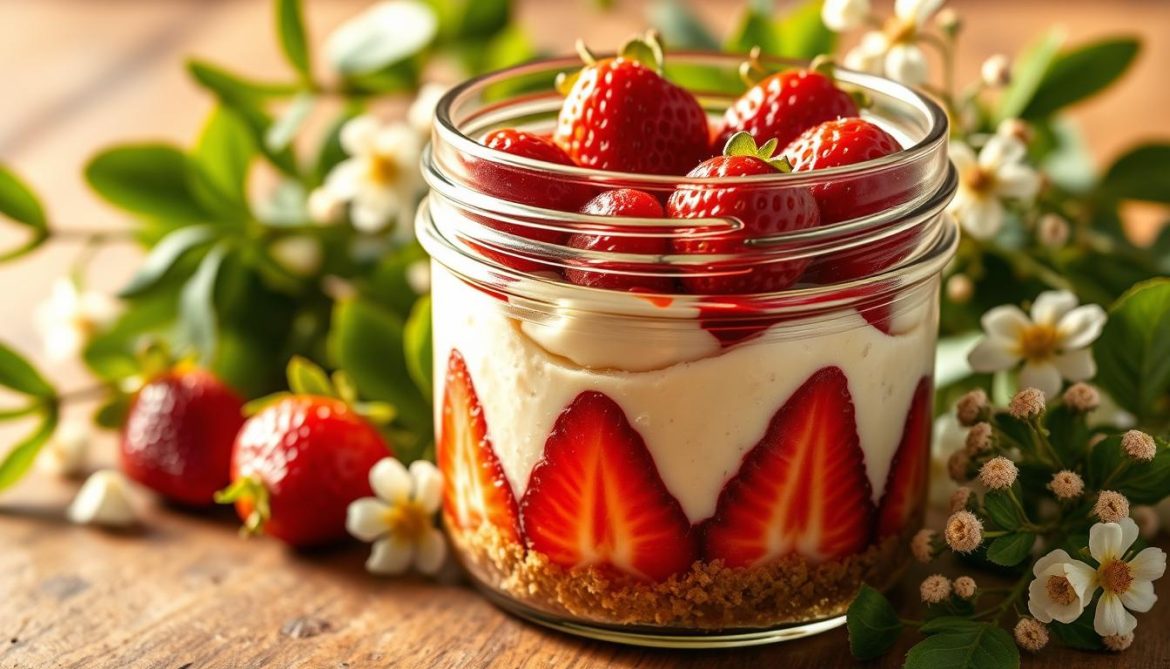
Hey dessert lovers! Get ready for the most irresistible strawberry cheesecake in a jar. This mason jar dessert is going to be your new favorite. It’s compact, adorable, and full of creamy deliciousness!
Imagine making individual portions of heavenly cheesecake that look amazing on Instagram. My strawberry cheesecake in a jar recipe is perfect for anyone. It’s simple yet impressive, and you don’t need to bake. These mason jar desserts are great for dinner parties or when you just want something sweet.
This recipe is special because it’s easy, portable, and looks like you’re a pro. No complicated techniques or stress. Just pure dessert magic in a cute little jar. Let’s start this delicious journey!
Why Mason Jar Desserts Are Trending in Home Kitchens
The world of food has fallen in love with portable cheesecakes in mason jars. These desserts have changed how we enjoy sweet treats. They bring convenience and creativity to kitchens everywhere.
“Mason jar desserts aren’t just a trend – they’re a delicious solution for modern home cooks!” – Culinary Innovations Magazine
So, why are mason jar desserts so popular? Let’s explore the charm of these desserts:
- Perfect portion control for individual cheesecake servings
- Incredibly portable and easy to transport
- Instagram-worthy presentation
- Minimal cleanup required
- Can be prepared days in advance
The magic of portable cheesecake in mason jars is their versatility. They’re perfect for dinner parties, picnics, or just a personal treat. These jars are your secret weapon.
| Feature | Benefit |
|---|---|
| Compact Size | Easy storage and transportation |
| Sealed Container | Keeps dessert fresh longer |
| Personalized Portions | Perfect for different dietary needs |
Home bakers see mason jar desserts as more than practical. They’re an art form. Each jar becomes a canvas for culinary creativity. You can layer flavors, textures, and colors in a way traditional desserts can’t.
Essential Ingredients for Strawberry Cheesecake in a Jar
Making the perfect strawberry cheesecake starts with top-notch ingredients. Your dessert cups should get the best to stand out! Let’s explore the key parts that make your mason jar dessert amazing.
Choosing the Right Cream Cheese
The base of a great cheesecake is cream cheese. Always pick full-fat Philadelphia cream cheese for the best taste. Here’s what to look for:
- Smooth, creamy consistency
- No visible lumps
- Room temperature before mixing
Fresh vs. Frozen Strawberries
Choosing the right strawberries is crucial for your cheesecake. Here’s a quick look at the difference:
| Fresh Strawberries | Frozen Strawberries |
|---|---|
| Peak seasonal flavor | Available year-round |
| Brighter color | More consistent texture |
| Requires immediate use | Easy to store |
Best Graham Crackers for the Base
Your dessert cups need a fantastic crust! For the best graham cracker base, keep these tips in mind:
- Choose name-brand graham crackers with rich, buttery flavor
- Look for crackers without excess additives
- Consider honey or cinnamon varieties for extra depth
Pro tip: Crush graham crackers finely for a smooth, compact crust that holds together perfectly in your mason jar!
Kitchen Tools and Equipment You’ll Need
To make the perfect grab-and-go cheesecake, you’ll need some basic kitchen tools. You don’t need a fancy bakery to make these tasty mason jar desserts!
- Mason Jars: The main attraction of our grab-and-go cheesecake. Pick 8-ounce jars for the best individual servings
- Electric Mixer: Use a stand or hand mixer to make the cream cheese smooth
- Measuring Tools: You’ll need precise cups and spoons for the best results
- Mixing Bowls: Get different sizes for each layer
Tip for home bakers: A food processor can crush graham crackers fast. But, a zip-top bag and rolling pin work great too for our no-bake dessert!
| Tool | Purpose | Nice-to-Have Alternative |
|---|---|---|
| Electric Mixer | Whip cream cheese filling | Strong whisk and arm muscles |
| Mason Jars | Serving and storing grab-and-go cheesecake | Clear glass containers |
| Food Processor | Crush graham crackers | Rolling pin and bag |
“The right tools transform cooking from a chore to a creative adventure!” – Baking Enthusiasts Everywhere
Even if your kitchen isn’t fancy, you can still make amazing desserts. What’s most important is your creativity and passion for making these delicious grab-and-go cheesecakes!
Preparing Your Mason Jars: Size and Sterilization Guide
Creating the perfect strawberry cheesecake parfait starts with the right mason jars. These charming containers turn individual cheesecakes into a delightful treat. It’s both beautiful and delicious!
Choosing the right jar is key for your dessert’s success. Let me guide you through everything you need to know about mason jars for your sweet creation.
Perfect Jar Sizes for Individual Servings
Jar size is important for individual cheesecakes. Here are my top picks:
- 8-ounce jars: Ideal for standard portion sizes
- 12-ounce jars: Perfect for more generous desserts
- 4-ounce jars: Great for mini strawberry cheesecake parfaits
Sterilization Techniques
Clean jars are crucial for food safety and presentation. Follow these steps to prepare your mason jars:
- Wash jars in hot, soapy water
- Rinse thoroughly with clean water
- Sterilize by boiling for 10 minutes
- Allow jars to air dry completely
Storage Considerations
| Jar Type | Best For | Storage Duration |
|---|---|---|
| Wide-mouth jars | Easy layering | 3-4 days refrigerated |
| Screw-top jars | Long-term storage | Up to 5 days |
“The right jar can turn a simple dessert into a work of art!” – Dessert Enthusiast
Pro tip for your strawberry cheesecake parfait: Always ensure jars are completely dry before adding layers. This prevents moisture buildup. Your dessert will thank you!
Creating the Perfect Graham Cracker Crust Layer
Making the base of your mason jar dessert starts with a delicious graham cracker crust. This layer adds texture and flavor, turning a simple cheesecake into a show-stopper.
Here’s how to make the best graham cracker base for your mason jar dessert:
- Choose high-quality graham crackers for maximum flavor
- Crush crackers into fine, uniform crumbs
- Combine with melted butter for perfect binding
Choosing the right way to crush your crackers is key. I suggest two main methods:
- Food Processor Method: Quick and consistent crumb size
- Manual Crushing: Place crackers in a sealed bag and use a rolling pin
“The secret to an amazing layered dessert cup is a perfectly pressed graham cracker crust!” – Baking Enthusiast
Pro tip: Press the crumb mixture firmly into the bottom of each mason jar. Use the back of a spoon or a small glass to create a compact, even layer that will hold up when you dig in with your spoon.
| Ingredient | Quantity | Purpose |
|---|---|---|
| Graham Crackers | 1 1/2 cups | Base of the crust |
| Melted Butter | 1/3 cup | Binding agent |
| Granulated Sugar | 2 tablespoons | Additional sweetness |
| Salt | Pinch | Flavor enhancement |
Be creative with your layered dessert cups. Try adding spices like cinnamon or chopped nuts to your graham cracker base. This will make your crust even more delicious, enhancing the cheesecake filling and adding flavor to your mason jar dessert.
Whipping Up the Creamy Cheesecake Filling
Making the perfect strawberry cheesecake in a jar begins with a creamy filling. This no-bake treat needs special steps for that smooth texture everyone loves.
Achieving the Perfect Texture
For a smooth cheesecake filling, follow these steps:
- Use room temperature cream cheese for maximum smoothness
- Beat the cream cheese until it’s completely soft and lump-free
- Gradually incorporate powdered sugar to prevent clumping
- Fold in whipped cream gently to maintain a light, airy consistency
Flavor Enhancement Tips
Boost your strawberry cheesecake in a jar with these tips:
- Vanilla Extract Magic: Add 1-2 teaspoons for depth of flavor
- Zest of lemon to brighten the creamy filling
- A pinch of salt to enhance overall sweetness
- Consider adding a splash of strawberry liqueur for an adult twist
“The perfect no-bake dessert is all about technique and imagination!” – Baking Enthusiast
Pro tip: Mix your cheesecake filling with a hand mixer on low speed. This keeps it light and prevents over-beating. Aim for a silky-smooth texture that melts in your mouth!
Preparing Fresh Strawberry Compote
Making the perfect strawberry compote is key to a stunning fresh strawberry cheesecake. This vibrant sauce turns a simple dessert into a show-stopping strawberry cheesecake parfait. It will impress your guests for sure!
- Select the ripest, most fragrant strawberries you can find
- Choose organic berries for maximum flavor intensity
- Aim for berries that are deep red and slightly soft to the touch
“The magic of a great fresh strawberry cheesecake lies in its compote!” – Pastry Chef Secrets
My go-to method is cooking strawberries with the right mix of ingredients. Here’s a quick guide to making the perfect compote:
| Ingredient | Quantity | Purpose |
|---|---|---|
| Fresh Strawberries | 2 cups | Primary fruit base |
| Granulated Sugar | 1/4 cup | Sweetness and syrup formation |
| Lemon Juice | 1 tbsp | Brightness and color preservation |
Here are the steps for your strawberry cheesecake parfait compote:
- Wash and hull strawberries
- Chop berries into small, uniform pieces
- Combine ingredients in a saucepan
- Simmer on low heat for 10-15 minutes
- Cool completely before using
Pro tip: For an extra flavor dimension, try adding a splash of vanilla extract or a pinch of black pepper to your compote. These unexpected ingredients can make your fresh strawberry cheesecake truly extraordinary!
Step-by-Step Assembly Process
Making individual cheesecake servings is an art that needs patience and care. These layered dessert cups turn simple ingredients into beautiful dishes. They will wow your guests and fulfill their sweet tooth.
Mastering the Layering Technique
To assemble your cheesecake jars, you need a plan. Begin with a solid base of graham cracker crust. Press the crumbs firmly into the jar’s bottom for a tight base.
- Use a spoon or small glass to evenly press the crust
- Aim for a consistent layer about 1/2 inch thick
- Refrigerate the crust layer for 10 minutes to set
Precision in Portion Control
When making individual cheesecakes, being consistent is crucial. Each layer must be measured carefully for a balanced and appealing dessert.
| Layer | Recommended Thickness | Filling Technique |
|---|---|---|
| Graham Cracker Crust | 1/2 inch | Press firmly with spoon |
| Cheesecake Filling | 1-1.5 inches | Pipe or spoon evenly |
| Strawberry Compote | 1/4-1/2 inch | Spread gently |
Pro tip: Fill jars about 3/4 full to prevent overflow and leave room for garnishes. Use a piping bag for clean, professional-looking layers in your layered dessert cups.
“The secret to beautiful desserts is not just in the taste, but in the careful construction of each delightful layer.” – Pastry Chef Emma Roberts
Storage Tips and Shelf Life

Making the perfect portable cheesecake is just the start. Knowing how to store it right keeps it fresh and safe to eat. Your grab-and-go cheesecake needs some extra care to stay delicious!
Refrigeration Essentials
The fridge is your best ally when storing your portable cheesecake. Here are some important storage tips:
- Seal each mason jar tightly with a lid or plastic wrap
- Store in the refrigerator at 40°F or below
- Keep cheesecakes away from strong-smelling foods
Shelf Life Magic
Your grab-and-go cheesecake can last surprisingly long. Pro tip: These treats stay fresh for 3-4 days in the fridge. The flavors get even better over time!
“A well-stored cheesecake is a happy cheesecake!” – Dessert Enthusiasts Cookbook
Transportation Tips
Got plans to take your portable cheesecake on the go? Remember these tips:
- Use a cooler with ice packs for transportation
- Add fresh toppings just before serving
- Avoid leaving at room temperature for more than 2 hours
Food safety is key when enjoying your tasty grab-and-go cheesecake. By following these storage tips, every bite will be as good as the first!
Make-Ahead Options for Special Occasions
Planning a party can be stressful. But our no-bake dessert mason jar recipes can save the day! These treats are perfect for making ahead. This way, you can enjoy your guests more and worry less about dessert.
Timing is key for make-ahead mason jar desserts. Let’s go over a simple plan to make you the star of any event!
Party Planning Timeline
Here’s a simple plan for making your no-bake dessert in mason jars:
- 2-3 Days Before the Event
- Prepare graham cracker crust
- Make cheesecake filling
- Store components separately in the refrigerator
- 1 Day Before the Event
- Assemble mason jar desserts
- Prepare strawberry compote
- Cover and refrigerate
- Day of the Event
- Add final garnishes
- Serve chilled
Transportation Guidelines
Transporting your mason jar desserts needs some planning. I’ve got a method to keep them perfect:
| Transportation Tip | Recommended Action |
|---|---|
| Chilling | Use a cooler with ice packs to maintain temperature |
| Stacking | Place jars carefully to prevent tipping |
| Garnishes | Bring toppings separately and add just before serving |
“The secret to a perfect party dessert is preparation and presentation!” – Dessert Enthusiast
With these make-ahead options, your no-bake mason jar desserts will be a hit. They’ll make any special occasion unforgettable and stress-free!
Creative Variations and Flavor Twists
Ready to turn your strawberry cheesecake parfait into a culinary adventure? Layered dessert cups are perfect for creativity. They offer endless possibilities to surprise and delight your taste buds.
Let’s explore exciting flavor combinations to elevate your strawberry cheesecake parfait:
- Tropical Dream: Swap strawberries for a vibrant mango and passion fruit compote
- Chocolate Lover’s Paradise: Rich chocolate cheesecake filling with raspberry swirls
- Seasonal Sensation: Pumpkin cheesecake with gingersnap crust for autumn vibes
“Cooking is an art, and these layered dessert cups are your delicious canvas!” – Culinary Inspiration
Crust alternatives can completely transform your parfait experience. Try these innovative base options:
| Crust Type | Flavor Profile | Best Pairing |
|---|---|---|
| Oreo Cookies | Rich Chocolate | Cookies & Cream Cheesecake |
| Shortbread | Buttery Delicate | Lemon Cheesecake |
| Pretzel Crumbs | Salty-Sweet | Caramel Cheesecake |
For an adult twist, try liqueur-infused fruit compotes or add flavored spirits to your cheesecake filling. The key is to have fun and make each strawberry cheesecake parfait uniquely yours!
Troubleshooting Common Issues
Making the perfect no-bake dessert can be tricky. Don’t worry, I’m here to help. We’ll tackle common problems and their fixes.

Texture Troubles: What to Watch For
Texture is key for your strawberry cheesecake in a jar. Here are some common issues:
- Runny Filling: Often caused by cream cheese being too warm or over-beating the mixture
- Lumpy Texture: Typically results from cold cream cheese
- Grainy Consistency: May indicate improper mixing or ingredient temperature
Quick Fixes for Setting Problems
No-bake desserts can be tricky to set. Here are some solutions:
| Problem | Solution |
|---|---|
| Cheesecake Won’t Firm Up | Add 1 tablespoon unflavored gelatin |
| Compote Too Watery | Cook longer or add 1 teaspoon cornstarch |
| Filling Too Soft | Chill for 30 minutes before assembling |
“Cooking is an art of patience and practice. Even mistakes can be delicious!” – Baking Enthusiast
Pro tips for your strawberry cheesecake in a jar: Always bring cream cheese to room temperature. Beat ingredients just until combined. And don’t rush the chilling process. Your no-bake dessert will thank you!
Temperature and Ingredient Secrets
Temperature is key for the perfect texture. Room temperature ingredients blend smoothly. This prevents lumps and ensures a silky-smooth cheesecake filling. Keep your ingredients at the right temperature for jar dessert perfection!
Serving Suggestions and Presentation Ideas
Ready to make your individual cheesecake servings look amazing? Presentation is everything with these cute mason jar desserts. Let’s explore some creative ways to make your grab-and-go cheesecake stand out.
Garnish Like a Pro
Make your dessert pop with these garnish ideas:
- Fresh strawberry slices on top
- Delicate sprinkle of graham cracker crumbs
- Elegant dollop of whipped cream
- Chocolate shavings for extra decadence
Styling Your Cheesecake Jars
Make your individual cheesecake servings into stunning treats with these styling tips:
- Tie a rustic ribbon around each jar
- Attach a small wooden spoon with twine
- Create a DIY dessert station with various toppings
“The secret to an unforgettable dessert is in the details!” – Pastry Chef Tip
For outdoor events, get creative with your presentation. Place your grab-and-go cheesecake jars in a tray of crushed ice. This keeps them cool and looks stunning. Remember, we feast with our eyes first!
Pro Presentation Tricks
Want to elevate your individual cheesecake servings? Try these expert suggestions:
- Use contrasting serving platters
- Create height variation with cake stands
- Add fresh mint leaves for a pop of color
With these tips, your cheesecake jars will not only taste incredible but look amazing too!
Nutritional Information and Dietary Modifications
Let’s explore the nutritional side of our strawberry cheesecake parfait! Knowing its health profile lets you enjoy it more. You’ll appreciate its nutritional benefits too.
The strawberry cheesecake parfait is more than just tasty. It’s packed with nutrients that might surprise you:
- Calcium-rich cream cheese supports bone health
- Vitamin C from fresh strawberries
- Protein from cream cheese and yogurt
Looking for dietary changes? I’ve got some great options that keep the flavor:
| Dietary Need | Modification |
|---|---|
| Low-Fat | Use Greek yogurt and reduced-fat cream cheese |
| Gluten-Free | Replace graham crackers with gluten-free cookie crumbs |
| Vegan | Swap dairy ingredients with coconut cream and plant-based cream cheese |
Pro tip: Natural sweeteners like stevia or monk fruit can reduce sugar content without compromising taste!
“Moderation is the key to enjoying delicious desserts while maintaining a balanced diet.” – Culinary Wisdom
Our portable cheesecake is more than a treat. It’s a carefully crafted experience for any diet. Enjoy every spoonful without guilt!
Tips for Perfect Photos of Your Jarred Dessert
Want to make your mason jar dessert go viral? Getting the perfect shot is more than just clicking the camera. Natural light is key. Place your jar near a soft, diffused window to highlight its layers and colors.
Composition is crucial. Use the rule of thirds to make your shot interesting. Place your jar off-center and get close to show off the layers. The strawberry and cream cheese textures will make everyone want to take a bite.
Adding props can make your photo pop. Try a vintage wooden board, fresh strawberries, or a silver spoon. Let your dessert warm up a bit before taking the photo. The condensation on the glass adds a tempting shine.
Don’t worry if it’s not perfect. The best food photos are real and show the dessert’s deliciousness. Try different angles, lighting, and most importantly, have fun with your layered dessert cups!